McLeod Master Cylinder and Drill Mod Install
| Tools &
parts you will need:
1. phillips screwdriver Expect approximately 1 hour - 3 hour install time. |
Date:
2001 Car: 1999 Z28 Camaro, 18,012 miles Installers: Darryl Stevens and Eric Barger Email: help@installuniversity.com People who helped us from major tech talk to general advice: 1. Darryl Stevens (Bean-o) - Darryl is the best LS1 mechanic in the state of Tennessee.
|
When purchasing, viewing, using, and/or any
other method applied to this publication you agree to the following statements.
You, your next of kin, heirs or assigns release www.installuniversity.com,
all other persons associated in the making, production, participation, and sale
of this publication. Rephrased in plain English: When you purchase
this CD, book, or view this web page you, your next of kin, heirs or assigns
agree not to sue any associated persons with the publication for any accident or
damage in ANY form (mental or physical to your car and/or yourself) because of
this publication or your failure to heed proper safety, maintenance and/or
modification procedures. You also agree that your next of kin, heirs
or assigns cannot sue all persons associated in the making, production,
participation, and sale of this publication.
Purpose: You will be replacing your factory master cylinder with an adjustable unit. This will allow you to control the pedal release and extend the life of your clutch. You will also be performing the "drill mod". This will remove the restriction that GM thought would be a great idea. Together, you should have a better setup than when you started.
Preface: A friend will make this install go a lot smoother and when installing your new master cylinder through he firewall, a friend is a must for most people. Before you start into this install be sure you know how to use all of your shop equipment. Take your time and be careful.
Notes:
1. We placed our front end under a set of jack stands and used a set of ramps as a back up lift device. You can never be too careful!
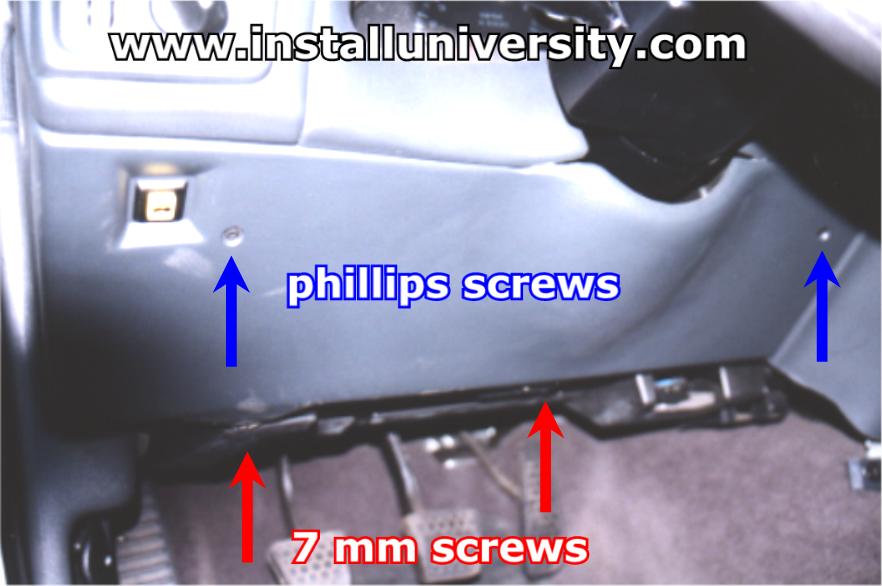
2. We then removed two Phillip's screws and two 7 mm screws under the driver's side dash (see Figure 1). Be sure to catch the dash panel before it falls more than a few inches. You will need to make sure not to tear the trunk release switch wire that will remain connected.
Figure 1
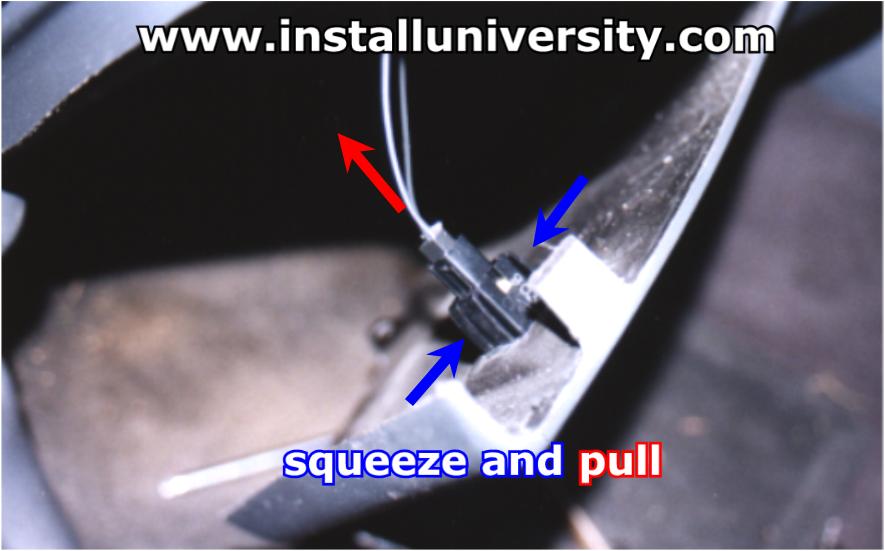
3. Disconnect the trunk release switch from the dash panel by gently squeezing the "ears" on the switch as shown in Figure 2. Lay the panel somewhere out of the way where it won't get scratched.
Figure 2
4. Remove the two push pin screws in each corner on the black plastic panel as shown in Figure 3. We just simply yanked them out by the head of the screw.
Figure 3
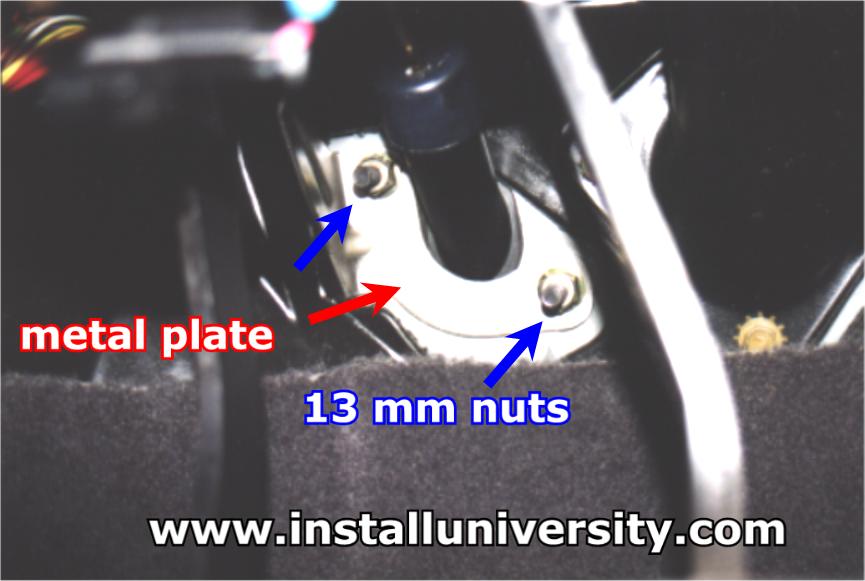
5. Remove the two 13 mm nuts using a wrench or deep well socket on the master cylinder located on the firewall behind the clutch pedal (see Figure 4).
Figure 4
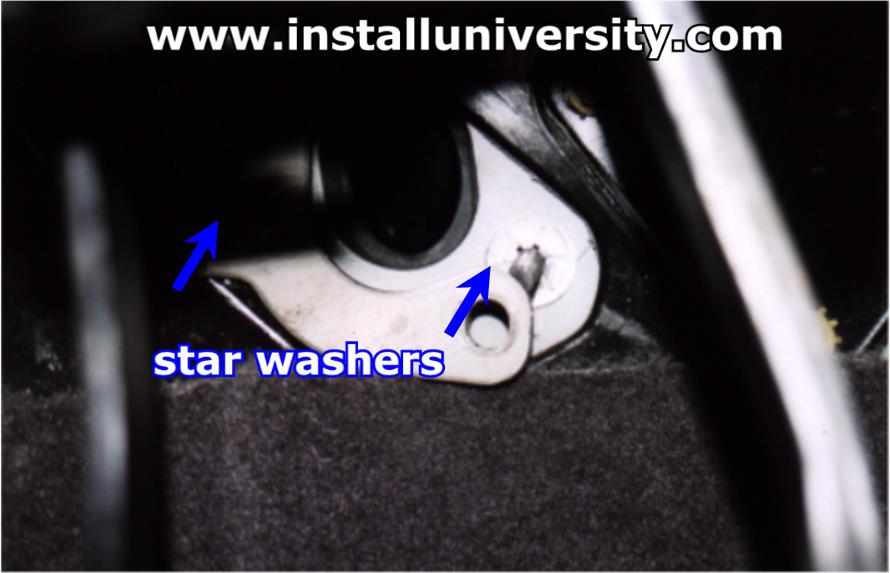
6. Remove the star washers as shown in Figure 5 holding the bolts through the firewall. We cut the washers off with a set of wire cutters and tossed them in the garbage can. You can choose to be more careful and reuse them if you want.
Figure 5
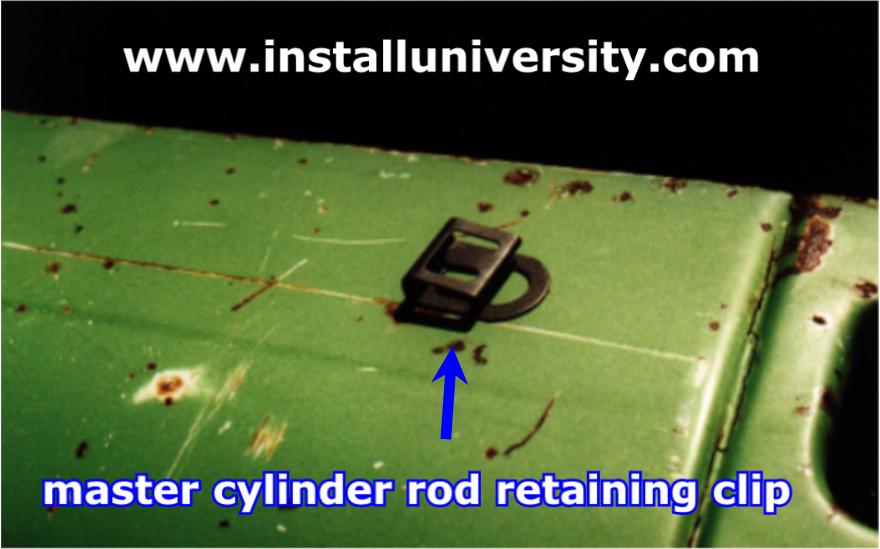
7. Up under the dash you will need to remove the master cylinder retaining clip from the end of the master cylinder rod. This clip will snap off and allow you to slide the master cylinder rod over and off the metal fitting. If you are having problems find the clip, just follow the rod from the firewall toward the clutch pedal. Once you see it, it will be clear how to remove it. I snapped several pictures of the clip on the master cylinder rod but none of them turned out very good because of the cramped conditions. So, I have placed a picture of the clip you will be looking for on the end of the master cylinder rod show in Figure 6.
Figure 6
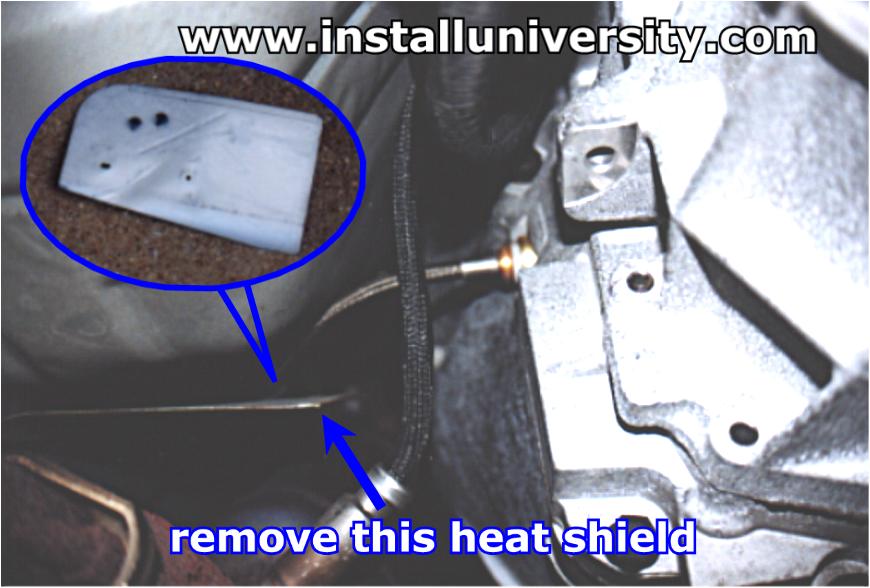
8. Underneath the car remove the heat shield using a 7 mm socket. I do not have a good picture of where the heat shield is located at the present time. You can find it by Figure 7 below and knowing that the steel braided line runs in-between the heat shield and body of the car. Just look for the similar heat shield and remove.
Figure 7
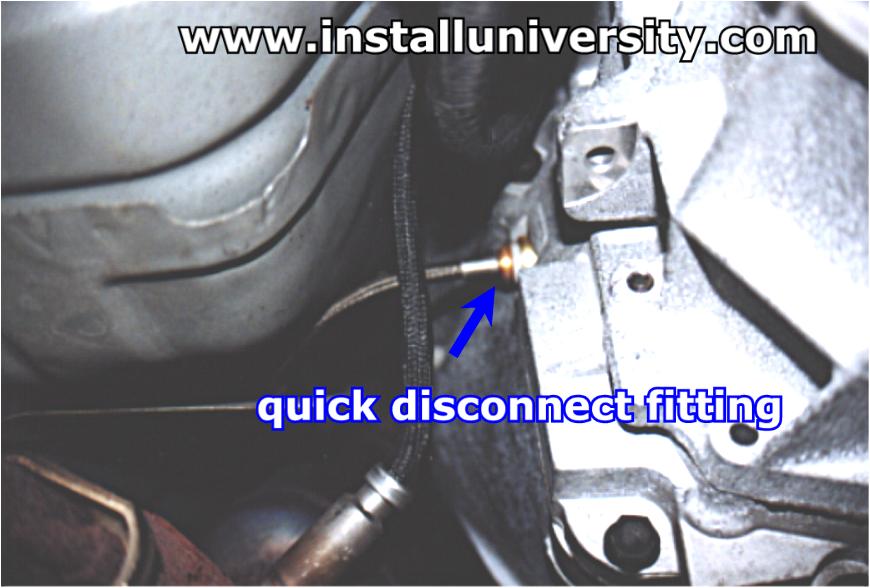
9. From underneath the car on the drivers side in the front of the transmission you will find a steel braided line the runs into the transmission (see Figure 8). You will need to use two flat bladed screw drivers to push the white plastic ring in towards the transmission. When the white plastic ring has been moved all the way, the line should disconnect itself.
Figure 8
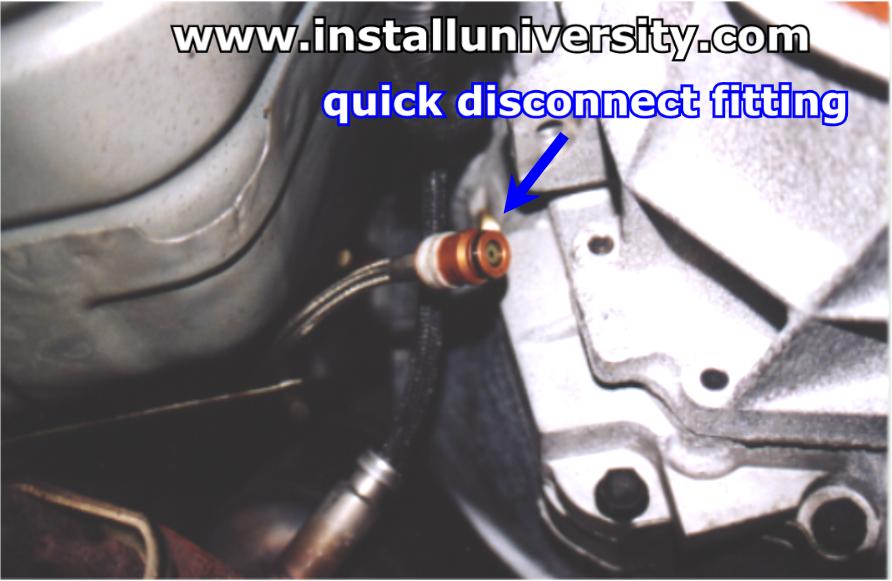
10. After you have disconnected the master cylinder steel braided line just let it hang freely away from any obstructions (see Figure 9).
Figure 9
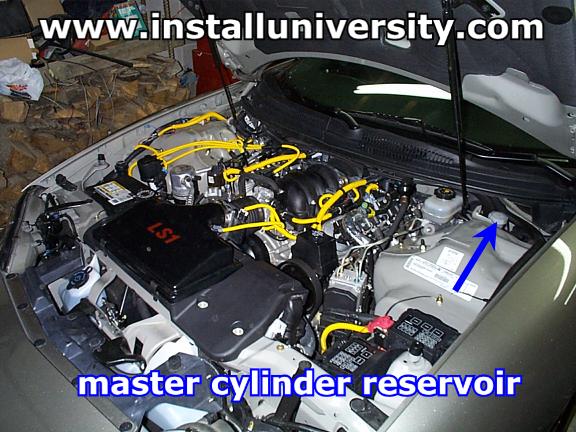
11. Underneath the hood locate the master cylinder reservoir, a whitish plastic cup shaped object, on the drivers side of the engine bay shown in Figure 10.
Figure 10
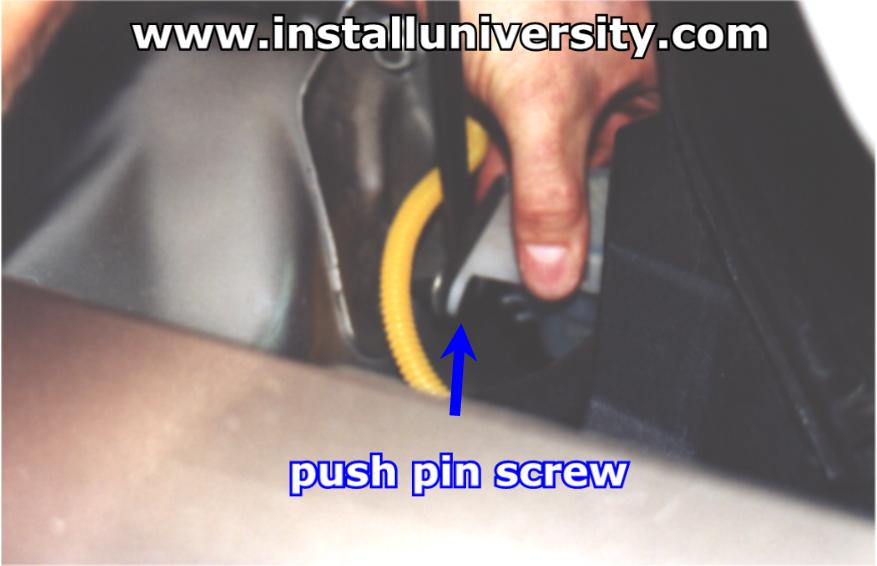
12. Remove the push pin screw from the master cylinder reservoir as show in Figure 11.
Figure 11
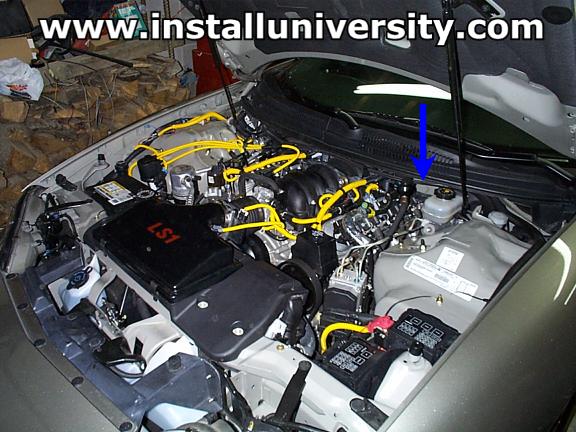
13. Reach down under the brake booster and toward the firewall and outside driver's side of the car. Feel for the master cylinder and u-bolt attached to the firewall. Pull the master cylinder out and back up. You will more than likely need a friend to help guide the rod through the firewall hole. It will be impossible to see with your eyes so you will have to let your fingers do the looking. Figure 12 below will try and get you pointed in the right direction. Be careful you don't put too much weight on the car and knock it off your jack stands or ramps! Also, be careful not to spill any fluid on your car's paint finish! It will eat the paint right off the car no matter where it touches. So be careful!
Figure 12
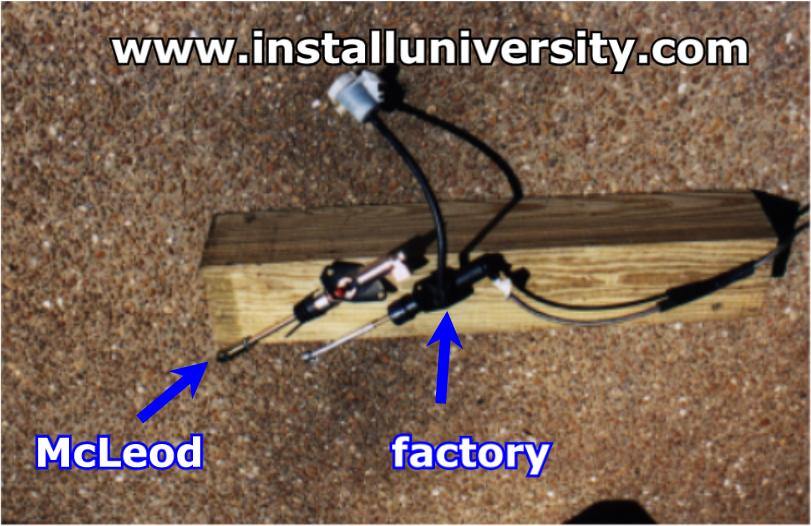
14. Now you should have the stock master cylinder, steel braided hose, and reservoir all out of the car (see Figure 13). You can compare the McLeod adjustable master cylinder with the factory unit. The McLeod just looks better in my opinion. :-)
Figure 13
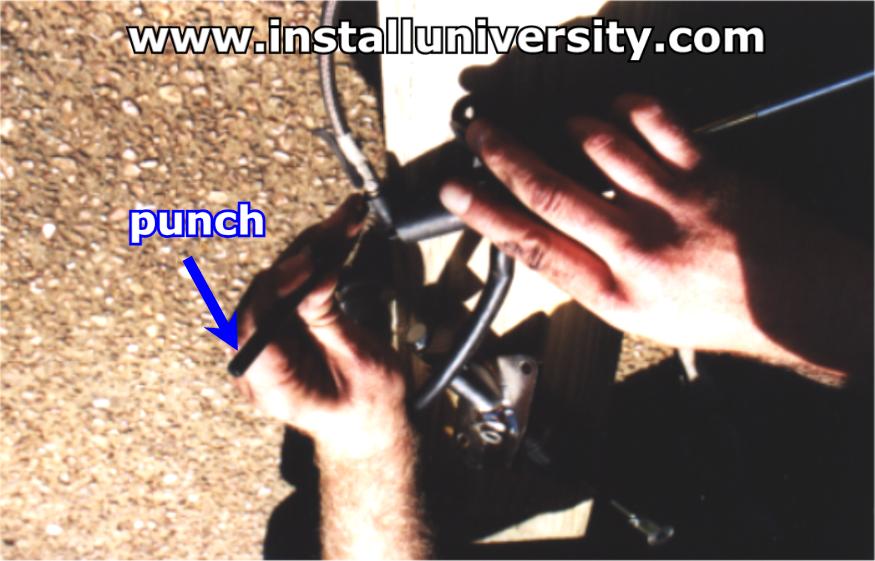
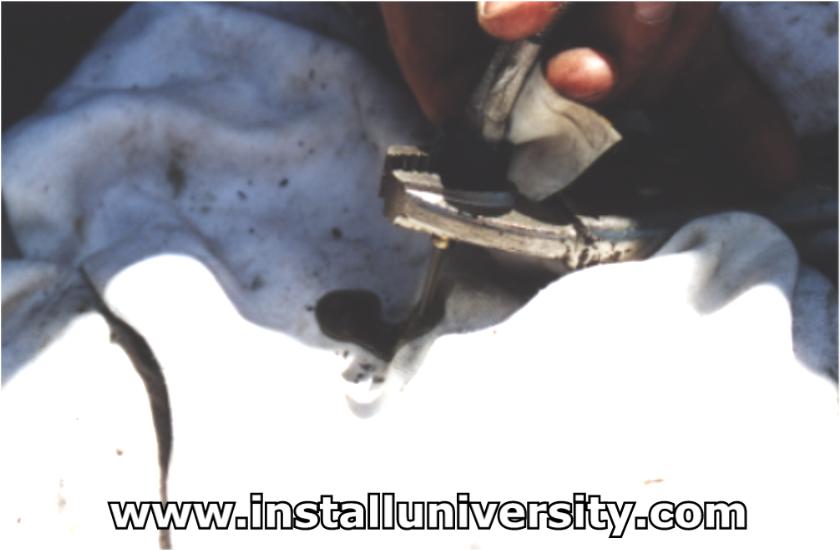
15. You now want to disconnect the steel braided line from the master cylinder. You will need to knock out the small roll pin shown in Figure 14. Figure 15 shows how the use of a small punch and a hammer with a light touch can ease the roll pin pin right out. After the roll pin is removed, gently pull the steel braided line out of the master cylinder.
Figure 14
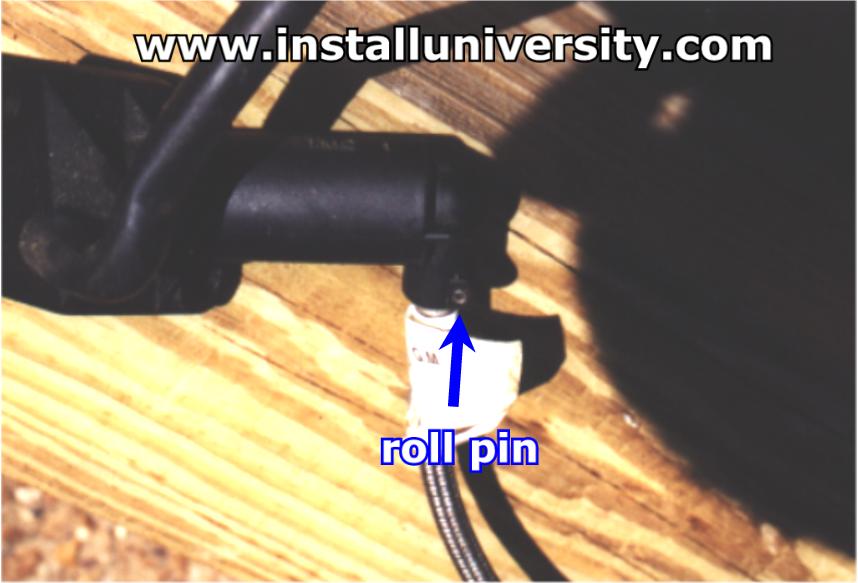
Figure 15
16. This step is known as the infamous "drill mod". The same modification can be found in numerous publications and bulletin boards over the internet. If you don't want to perform the drill mod, which at this point would be a pitiful shame because it only takes a minute to do, skip this step and continue on to Step 18.
You should now be left with the steel braided line as shown in Figure 16. We took a small piece of cut up vacuum hose (anything thick and flexible will do), and wrapped it around the brass part of the fitting on the steel braided line. Then we clamped down on it with a set of vice-grips to hold the line while the restriction would be drilled (see Figure 17). Take a 1/8" drill bit and slowly, constantly bringing the bit back out and then back in to remove metal shavings as often as possible, drill out the ingenious in-line restriction (lots of sarcasm) that GM decided was best for your blessed muscle car. You will have to drill until you feel the drill bit pass through the restriction. The bit should freely move into the line before you are through drilling. The total distance drilled will be in the neighborhood of one inch (1"). Also, while drilling, be sure to keep the steel braided line as straight as possible so you don't drill through the line by accident. This sounds like a lot to accomplish, but common sense will carry you through. ;-)
Figure 16
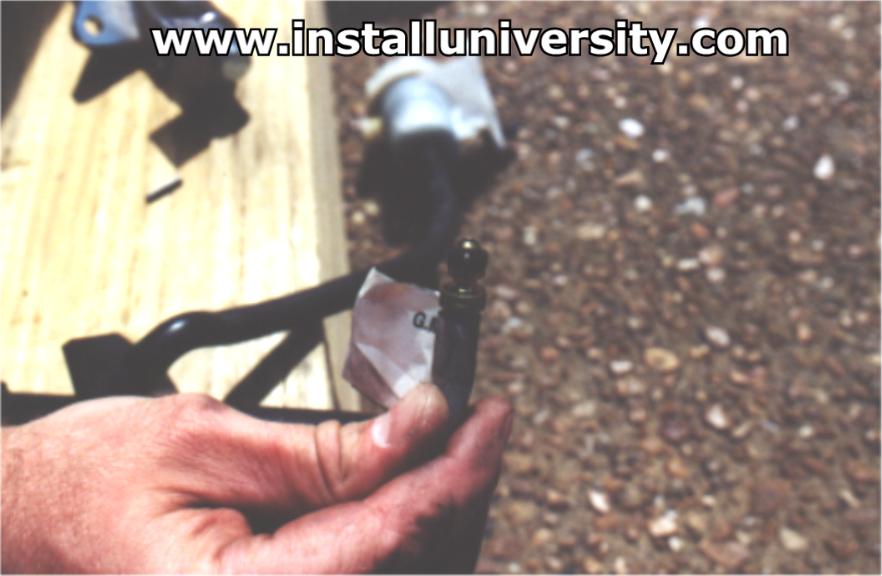
Figure 17

Figure 18
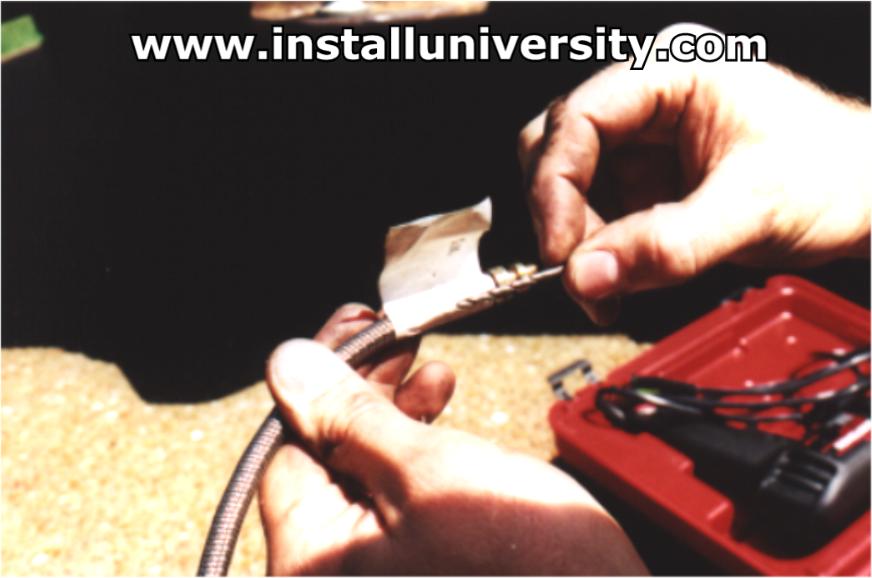
17. Now that you have the restriction drilled out you will need to flush some fluid through the line in order to remove any excess shavings left behind. You will need to press the end of the quick connect fitting down while squirting fluid onto and in the quick connect fitting as shown in Figure 19. This will allow fluid to flow down the line and wash out any excess shavings keeping them from entering your hydraulic system as shown in Figure 20. Be sure you have a rag to catch the fluid and metal shavings at the end of the line. We used a bulb syringe which can be acquired for a few dollars at most any local auto parts store.
Figure 19
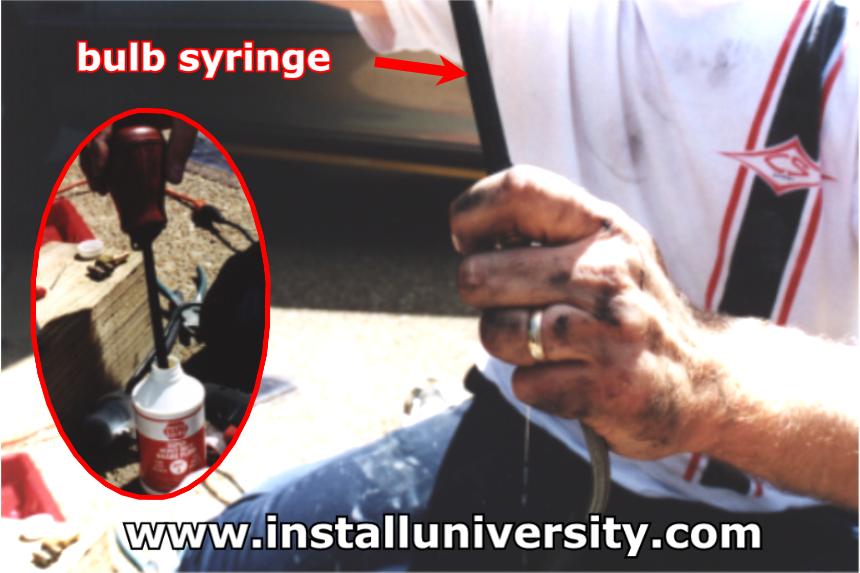
Figure 20
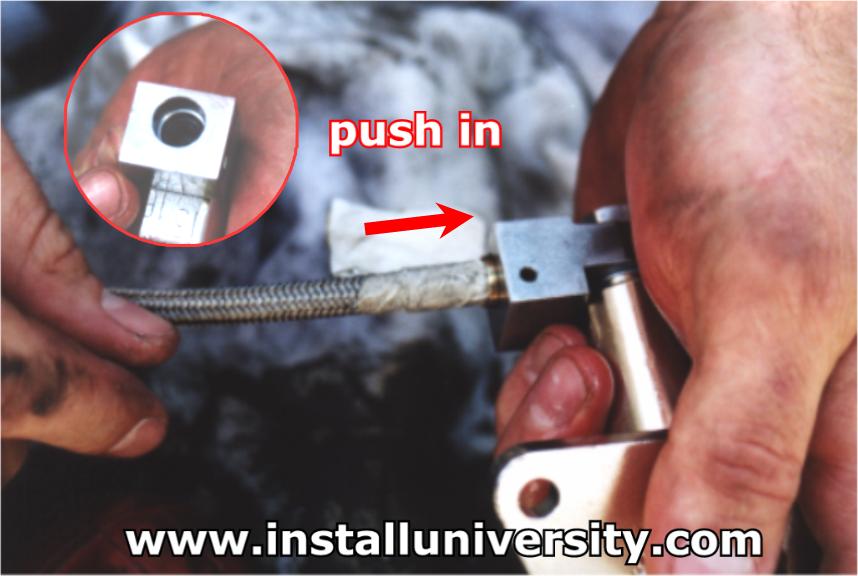
18. Take the rubber o-ring fitting from the original master cylinder and place it in the cup of the new master cylinder where the steel braided line installs too. Figure 21 shows where you will get the o-ring from and what the McLeod master cylinder cup looks like before and after the install of the o-ring. Install the steel braided line into the new master cylinder. When you press the end into the master cylinder socket, be sure you have the line in all the way. There are several groves in the master cylinder so be sure you bottom out the line as shown in Figures 22 and 23.
Figure 21
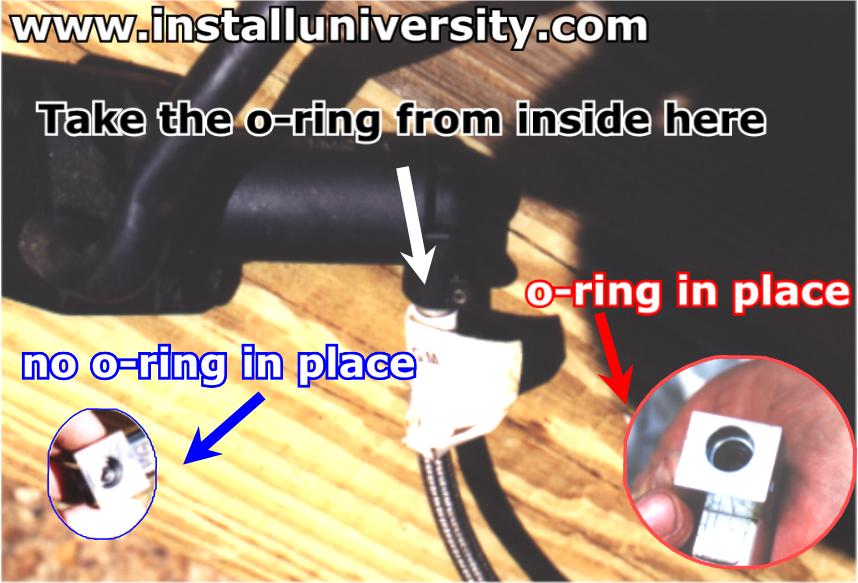
Figure 22
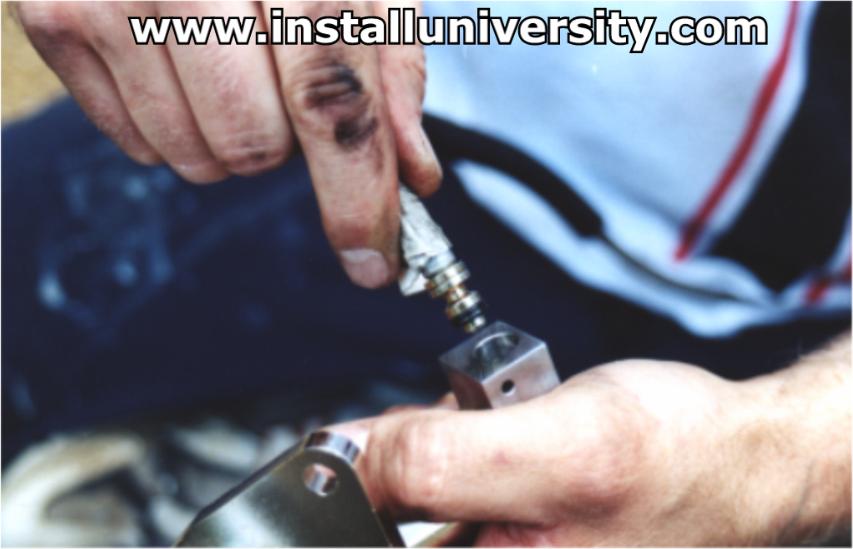
Figure 23
19. Replace the roll pin that you removed from the factory master cylinder into the new master cylinder as shown in Figure 24. Use a hammer and punch applying light taps to the roll pin the same as when removing it the first time. Be sure the roll pin is centered by checking both sides of the square receptacle making sure the gap is equal on both sides.
Figure 24
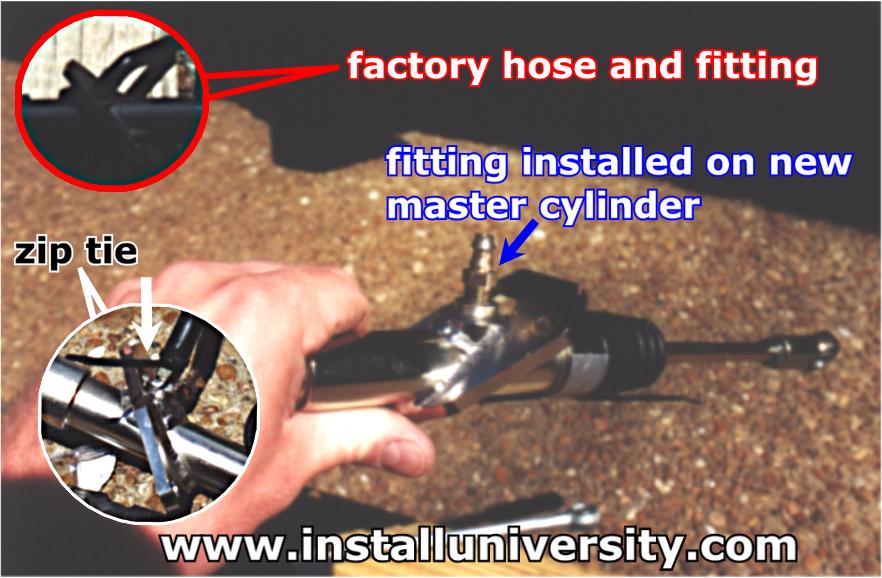
20. Now remove the rubber line off of the barbed fitting on the master cylinder you removed from the car. You want to then unscrew the barbed fitting using a crescent wrench. Apply some Teflon tape or thread sealant to the threads on the barbed fitting and tighten the fitting back up. There is not a torque specification that I know so we just tightened it to "tight" as shown in Figure 25. Once the fitting is tightened up replace the rubber hose back on the fitting and place a zip tie around the hose and fitting. Be sure to trim off the extra slack on the zip tie once it is tightened.
Figure 25
21. Do a test fit with the u-bolt into the McLeod unit. We had to use a Dremel tool with a cutting bit to open up the holes a little so the u-bolt would slide all the way through. It seems that some of the McLeod units have problems with this and some do not. Either way, it is no problem at all to overcome.
22. Now you want to pre-bleed the system to get remove any air trapped in the system. You will need to fill the reservoir up with DOT 3 approved brake fluid and force air into the reservoir or suck air out of the quick connect fitting end until the air is bleed completely. Have your friend push and pump on the master cylinder actuating rod by hand while you press on the center of the quick disconnect fitting at the end of the steel braided line. This will "bench bleed" or pre-bleed the system.
23. You are now ready to reassemble the master cylinder in reverse order. I am not going to lay out the steps again for you. Just start at Step 13 and work your way backwards. Here are a few tips to help you along the way back. You will need a friend to help guide the master cylinder rod back through the fire wall. Be patient and take your time as it will take a few minutes to accomplish this.
24. Tighten the 13 mm master cylinder nuts to 15 ft-lb as shown in Figure 26.
Figure 26
25. Tighten all 7 mm and phillips screws to "snug" as shown in Figure 27.
Figure 27
26. After you have the master cylinder rod connected back to the clutch pedal, you will need to bleed the system once again. Before you can connect the quick connect fitting back into the transmission you will need to open the bleeder valve to let the pressure off the clutch system or you will not be able to get the quick connect fitting connected.
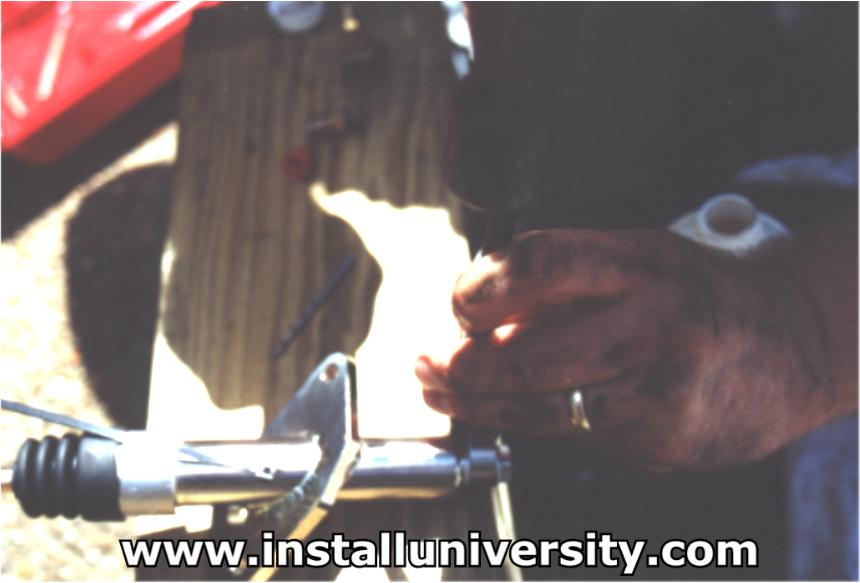
We accomplished this by the following procedure. Fill the reservoir to full. Underneath the car you will need a 1/4" drive 7/16" socket and a small 1/4" drive breaker to open up the bleeder valve for a few seconds. The bleeder valve is located about 2.5 inches or so above the quick connect fitting; you won't be able to see it with your eyes just feel for it. Connect the quick connect fitting (steel braided line) back into it's receptacle. Check the reservoir again and top off if needed. Hold the clutch pedal to the floor and open the bleeder valve until the fluid flow slows way down. Release the clutch pedal and check the reservoir level. Top it off as needed. Press the clutch pedal again to the floor and hold it while opening the bleeder valve. Repeat this process until you get the normal feel back in the clutch pedal. We ended up just pumping my clutch pedal 30 or so times over and over until the feel came back to the pedal. Obviously, you will need a friend under the car operating the bleeder valve while the clutch pedal is be held on the floor.
27. Once you have the adjustable unit installed, you will need to adjust the unit to the engagement point you like. This is done by simply removing the retaining clip, loosening the nut with a 9/16" wrench and turning the rod 1-2 turns at a time clockwise to move the engagement point toward the floorboard or counter clockwise to move the engagement point upward. Complete this procedure until you are comfortable with the install. Replace the retaining clip; a set of needle nose pliers does a fine job for limited space available. Feel free to install dash panels at this point.
28. Have a great time knowing our clutch is fully engaging and is totally adjustable. I can shift into third gear much easier with a lot less notchy feel. A special thanks to Darryl Stevens for his help on yet another LS1 install. Darryl is the best LS1 mechanic in the state of Tennessee. Darryl also provides CNC ported heads for an excellent price.
Web Author: Eric Barger
help@installuniversity.com
Copyright © 1999 - 2002 Eric Barger. All rights reserved.
Revised: June 07, 2007
.