Shifter Install
Tools &
parts you will need:
Expect approximately 30 minute – 2 hour install time. |
Date:
June 26, 2000 Car: 1999 Z28 Camaro, Installers: Eric and Kelly Barger Email: help@installuniversity.com People who helped us from major tech talk to general advice:
|
When purchasing, viewing, using, and/or any
other method applied to this publication you agree to the following statements.
You, your next of kin, heirs or assigns release www.installuniversity.com,
all other persons associated in the making, production, participation, and sale
of this publication. Rephrased in plain English: When you purchase
this CD, book, or view this web page you, your next of kin, heirs or assigns
agree not to sue any associated persons with the publication for any accident or
damage in ANY form (mental or physical to your car and/or yourself) because of
this publication or your failure to heed proper safety, maintenance and/or
modification procedures. You also agree that your next of kin, heirs
or assigns cannot sue all persons associated in the making, production,
participation, and sale of this publication.
Purpose: This mod will serve several purposes for your car. It will help you shift quicker by reducing the throw and having more confidence in shifting.
Preface: This install pretty much goes for all shifters on a LS1 F-Body. The factory, factory Hurst, and SLP shifters do not have any stop bolts or adjustments. They are bolt on shifters that require no adjusting. If you decide to use a shifter that has the adjustment stops you will need to read the directions on how to adjust the stop bolts. Everything else should be fine. We had our car ordered with the factory Hurst option. We are running you through the steps with our shifter to show you how it is done.
This modification is only for Manual transmission cars. This install does not have anything to do with the automatic transmissions. Before you start into this install be sure you know how to use all of your shop equipment. Take your time and be careful.
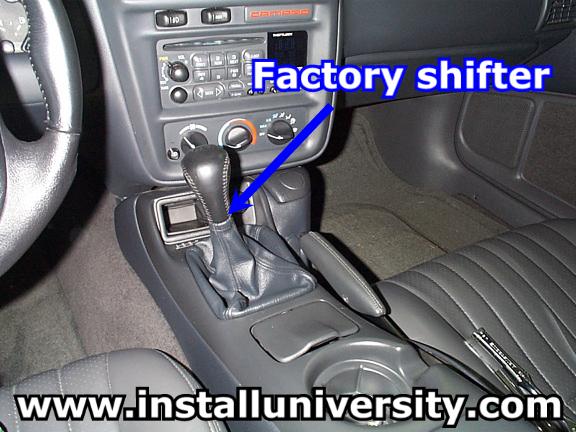
1. Chock your tires or make sure you are level ground and are in no danger moving while you are performing this install.
2. Locate the shifter in your car (see blue arrow in Figure 1).
Figure 1
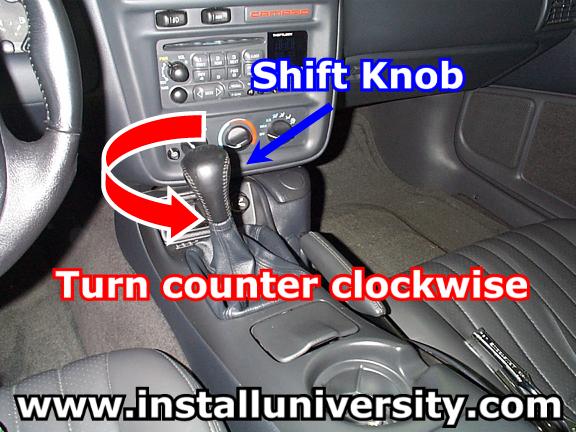
3. Locate and remove the shift knob on your shifter (see blue arrow in Figure 2). Rotate the knob counter clockwise until it comes off. If it is a little hard to start twisting just keep at it. The knob is really hard to remove the first time.
Figure 2
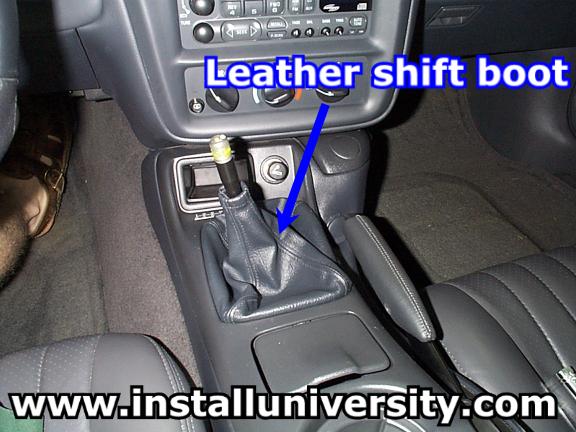
4. Locate and remove the leather boot on your shifter (see blue arrow in Figure 3). Just be really easy and pull the shift boot up. Take note of how you take it out so you can put it back in the same way. If you are not careful you will break the thin plastic frame inside the lower part of the leather boot.
Figure 3
5. Please read this step in full before continuing.
Locate the emergency brake on the center console in your car. You want to place the brake in a 90-degree (straight up) position.
Be very careful when performing this step. While helping a friend swap his factory shifter for the SLP shifter he got to playing around in there (because he was curious) and broke the spring and several other components (that we did not find) causing him NOT to have his Emergency Brake.
You do not want to pull the brake with all your might to get it to be straight up. That is not how we go about this.
You will need a flat head screwdriver that is fairly long in length. Pry the rubber flaps apart on the emergency brake (see blue arrows in Figure 4). On the passenger side of the emergency brake handle you will see metal piece that appears gold in color. This is commonly referred to as a "pawl". You will need to slide the edge of the flat head screwdriver in between the pawl and the cam with teeth. You can take a look at the inside of the console in Figure 5 below to get a better sense of what you are trying to do. This is easy to do because the pawl does not touch the cam.
Figure 4
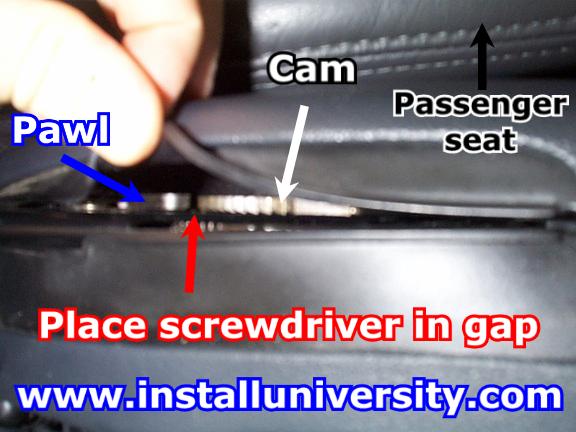
Figure 5

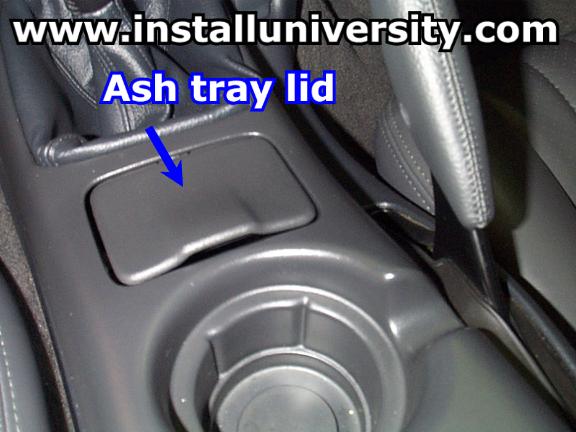
6. Locate and open your ashtray (see blue arrow in Figure 6).
Figure 6
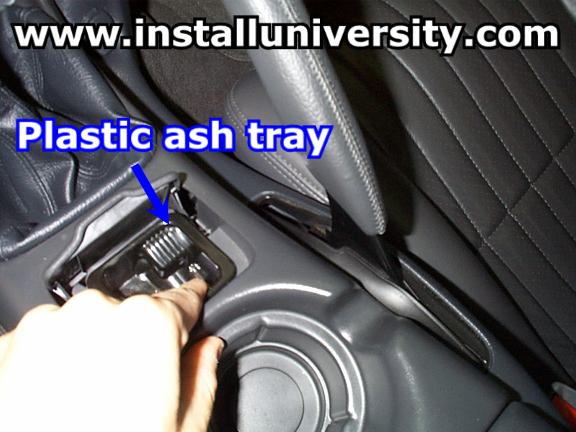
7. Remove the plastic tray by lifting it out (see blue arrows in Figure 7).
Figure 7
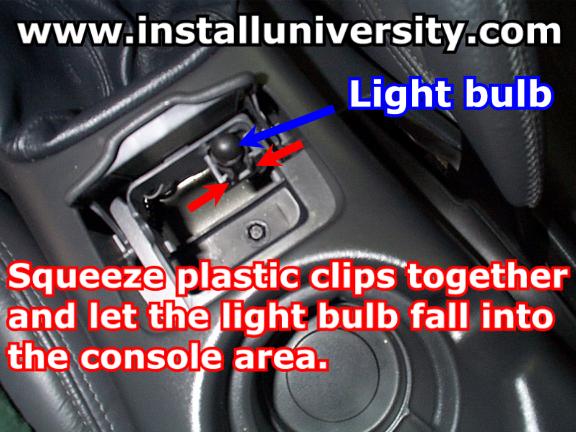
8. Locate the light bulb in the compartment (see Figure 8). Be careful when removing the light bulb. It will get really hot if it has been on for any extended lengths of time. Remove the bulb from the holder by squeezing the plastic clips together. Let the light fall down underneath the console.
Figure 8
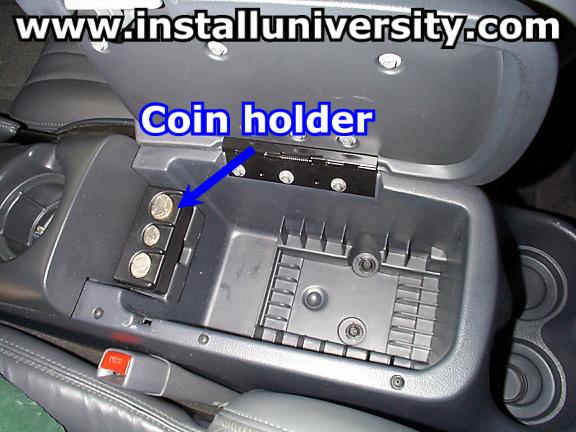
9. Open your storage compartment and remove the coin holder by lifting up on it (see blue arrow in Figure 9).
Figure 9
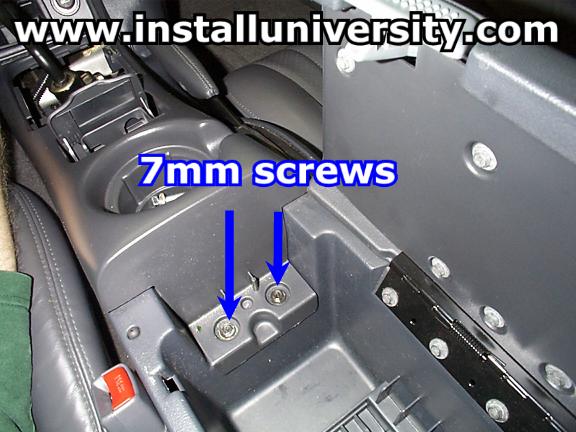
10. Remove the two 7 mm screws in the bottom of the compartment (see blue arrows in Figure 10).
Figure 10
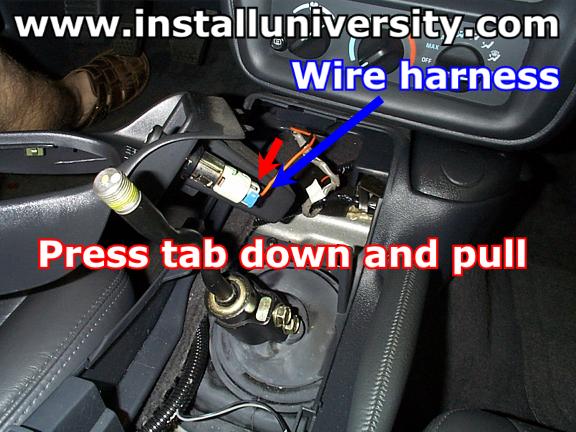
11. Read this step in full before proceeding. Lift and remove the center compartment and gently pull the compartment back (see blue arrows in Figure 11). There is a wire connected to the cigarette lighter in the center console (see Figure 12). Once you have the console free, find and disconnect the wire harness from the cigarette lighter.
Figure 11
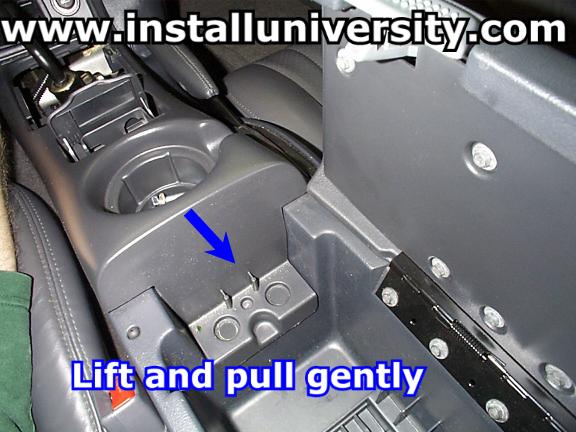
Figure 12
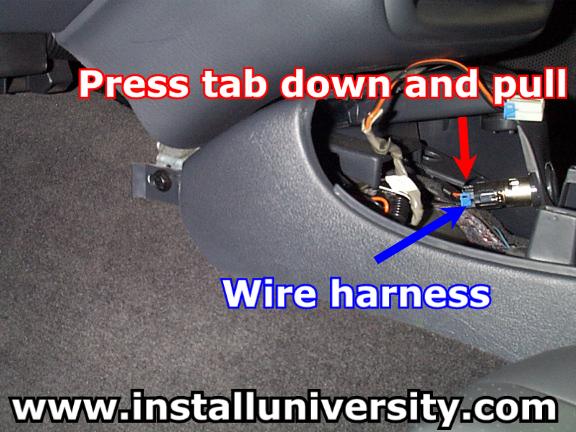
12. There is a wire connected to the auxiliary power outlet in the lower center console (see Figure 13). Press the tab down and pull the wire harness from the power outlet.
Figure 13
13. Remove the two 10 mm screws in the bottom of the storage compartment (see blue arrows in Figure 14).
Figure 14

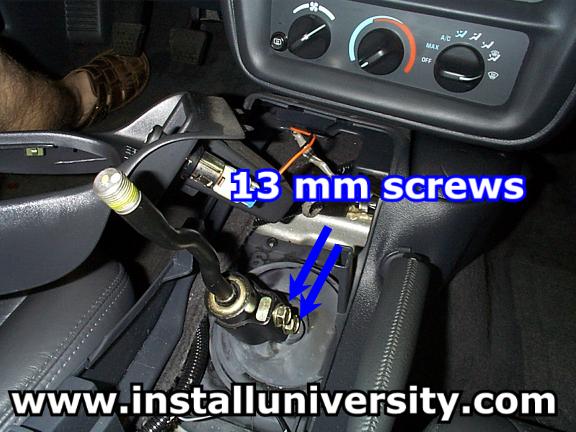
14. Locate and remove the 13 mm bolts that are located at the base of the shifter handle (see blue arrow Figure 15).
Figure 15
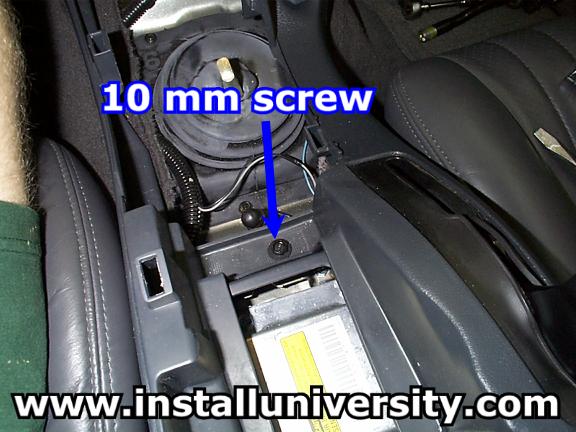
15. Locate and remove the 10 mm screw that is located below the ashtray (see blue arrow Figure 16).
Figure 16
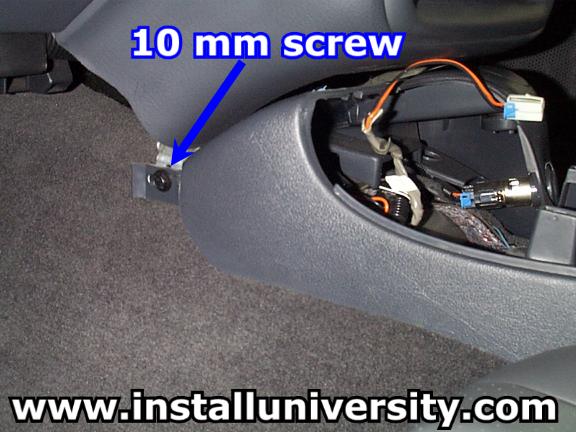
16. Locate and remove the 10 mm screw down next to your gas pedal (see blue arrow Figure 17).
Figure 17
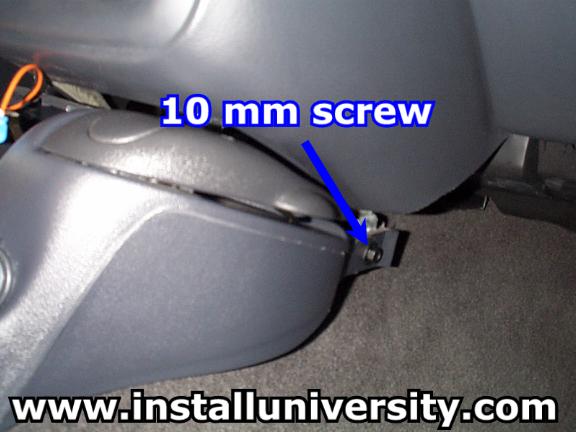
17. Locate and remove the 10 mm screw on the passenger side of the dash down low (see blue arrow Figure 18).
Figure 18
18. Lift the lower part of the console up and out. Just be careful and take your time.
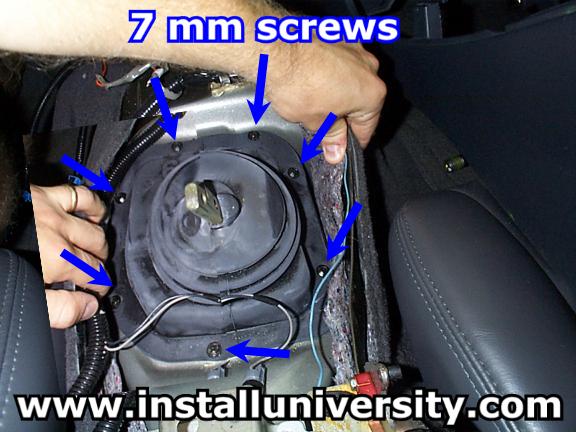
19. Locate and remove the seven 7 mm screws on the shift control closeout boot (see blue arrows in Figure 19).
Figure 19
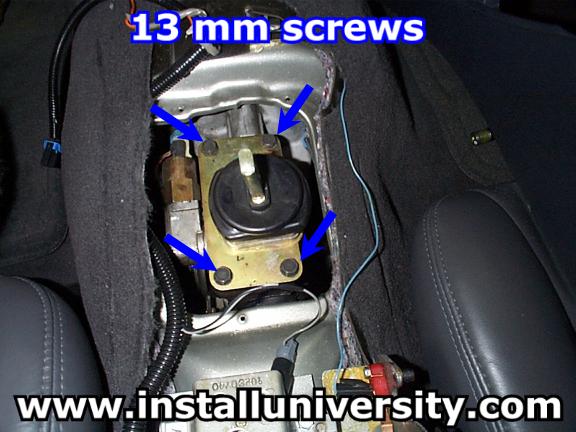
20. Locate and remove the four 13 mm bolts on the base plate of the shifter (see blue arrows in Figure 20).
Figure 20
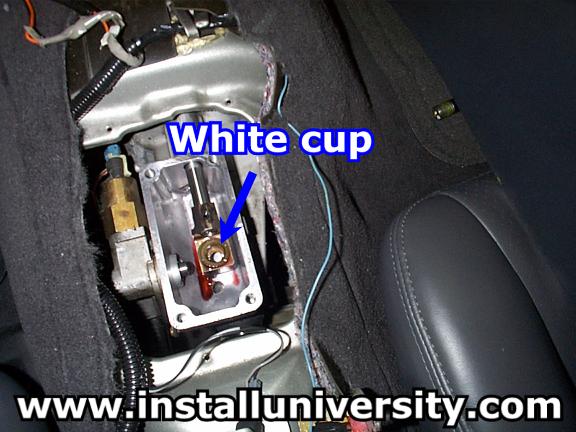
21. Remove and inspect the white cup (see Figure 21) and make sure it is not shredded or cut up. If it has defects replace it with a new one. Our cup is not so white; they get dirty over time.
Figure 21
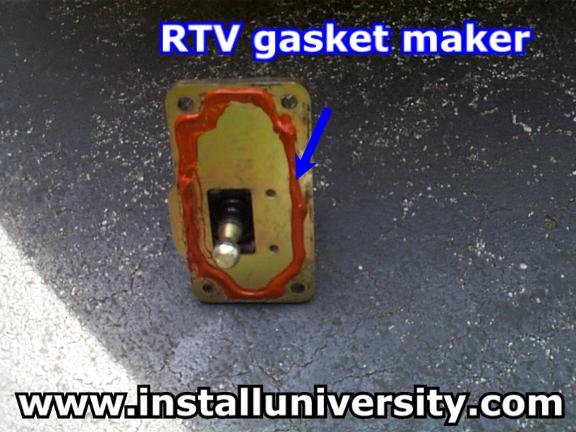
22. Take your new shifter and clean the bottom of the base plate off really well. You will then want to place a 3 mm bead of high temp silicone RTV gasket maker on the bottom of the shift plate (see Figure 22). Make sure to get the RTV gasket on the inside of the bolt holes. Let the RTV gasket sit for at least 15 minutes before putting the shifter back on.
Figure 22
23. Tighten the four 13 mm bolts on the base plate of the shifter to 13 ft-lb (see blue arrows in Figure 23).
Figure 23
24. Replace the seven 7 mm screws on the shift control closeout boot and tighten to 18 in-lb (see blue arrows in Figure 24).
Figure 24
25. Replace the shifter handle and tighten the 13 mm bolts to 18 ft-lb (see Figure 25).
Figure 25
26. Start at Step 18 and work your way backwards reassembling everything back together. Tighten all the screws to "snug" and everything will be just fine.
Comments: A good shifter should be the first modification made to your car in our opinion. A good shifter will help in keeping you from missing a shift and causing damage to your car.
Web Author: Eric Barger
help@installuniversity.com
Copyright © 1999 - 2002 Eric Barger. All rights reserved.
Revised: June 07, 2007
.