
Throttle Body Install
Tools &
parts you will need:
Expect approximately 30 minute – 2 hour install time. |
Date:
June 26, 2000 Car: 1999 Z28 Camaro, Installers: Eric and Kelly Barger Email: help@installuniversity.com People who helped us from major tech talk to general advice:
|
When purchasing, viewing, using, and/or any
other method applied to this publication you agree to the following statements.
You, your next of kin, heirs or assigns release www.installuniversity.com,
all other persons associated in the making, production, participation, and sale
of this publication. Rephrased in plain English: When you purchase
this CD, book, or view this web page you, your next of kin, heirs or assigns
agree not to sue any associated persons with the publication for any accident or
damage in ANY form (mental or physical to your car and/or yourself) because of
this publication or your failure to heed proper safety, maintenance and/or
modification procedures. You also agree that your next of kin, heirs
or assigns cannot sue all persons associated in the making, production,
participation, and sale of this publication.
Purpose: This mod will serve several purposes for your car. A new ported and polished throttle body will increase horsepower by increasing the air flow into your intake manifold.
Preface: Before you start into this install be sure you know how to use all of your shop equipment. Take your time and be careful.
Reminder: Make sure you have the keys out of the ignition. Why? When you remove the sensors from the air box lid assembly you do not want to start the car. You will set the Service Engine Soon (SES) light. If you do start the car without placing the sensors back in you can easily reset the SES light by following these steps:
1. Turn key to the "on"
position but don't start car
2. Pull the PCM BAT and PCM IGN fuses in engine compartment
3. Wait approximately 5 minutes
4. Turn ignition off
5. Replace fuses
6. Start the car and then make sure the light has gone off
1. Open the hood of your car and look in the front and center of the engine compartment. Locate the air box lid metal clamps (see blue arrows in Figure 1).
Figure 1
2. Go ahead and undo the air box metal clamps (see blue arrows in Figure 2).
Figure 2

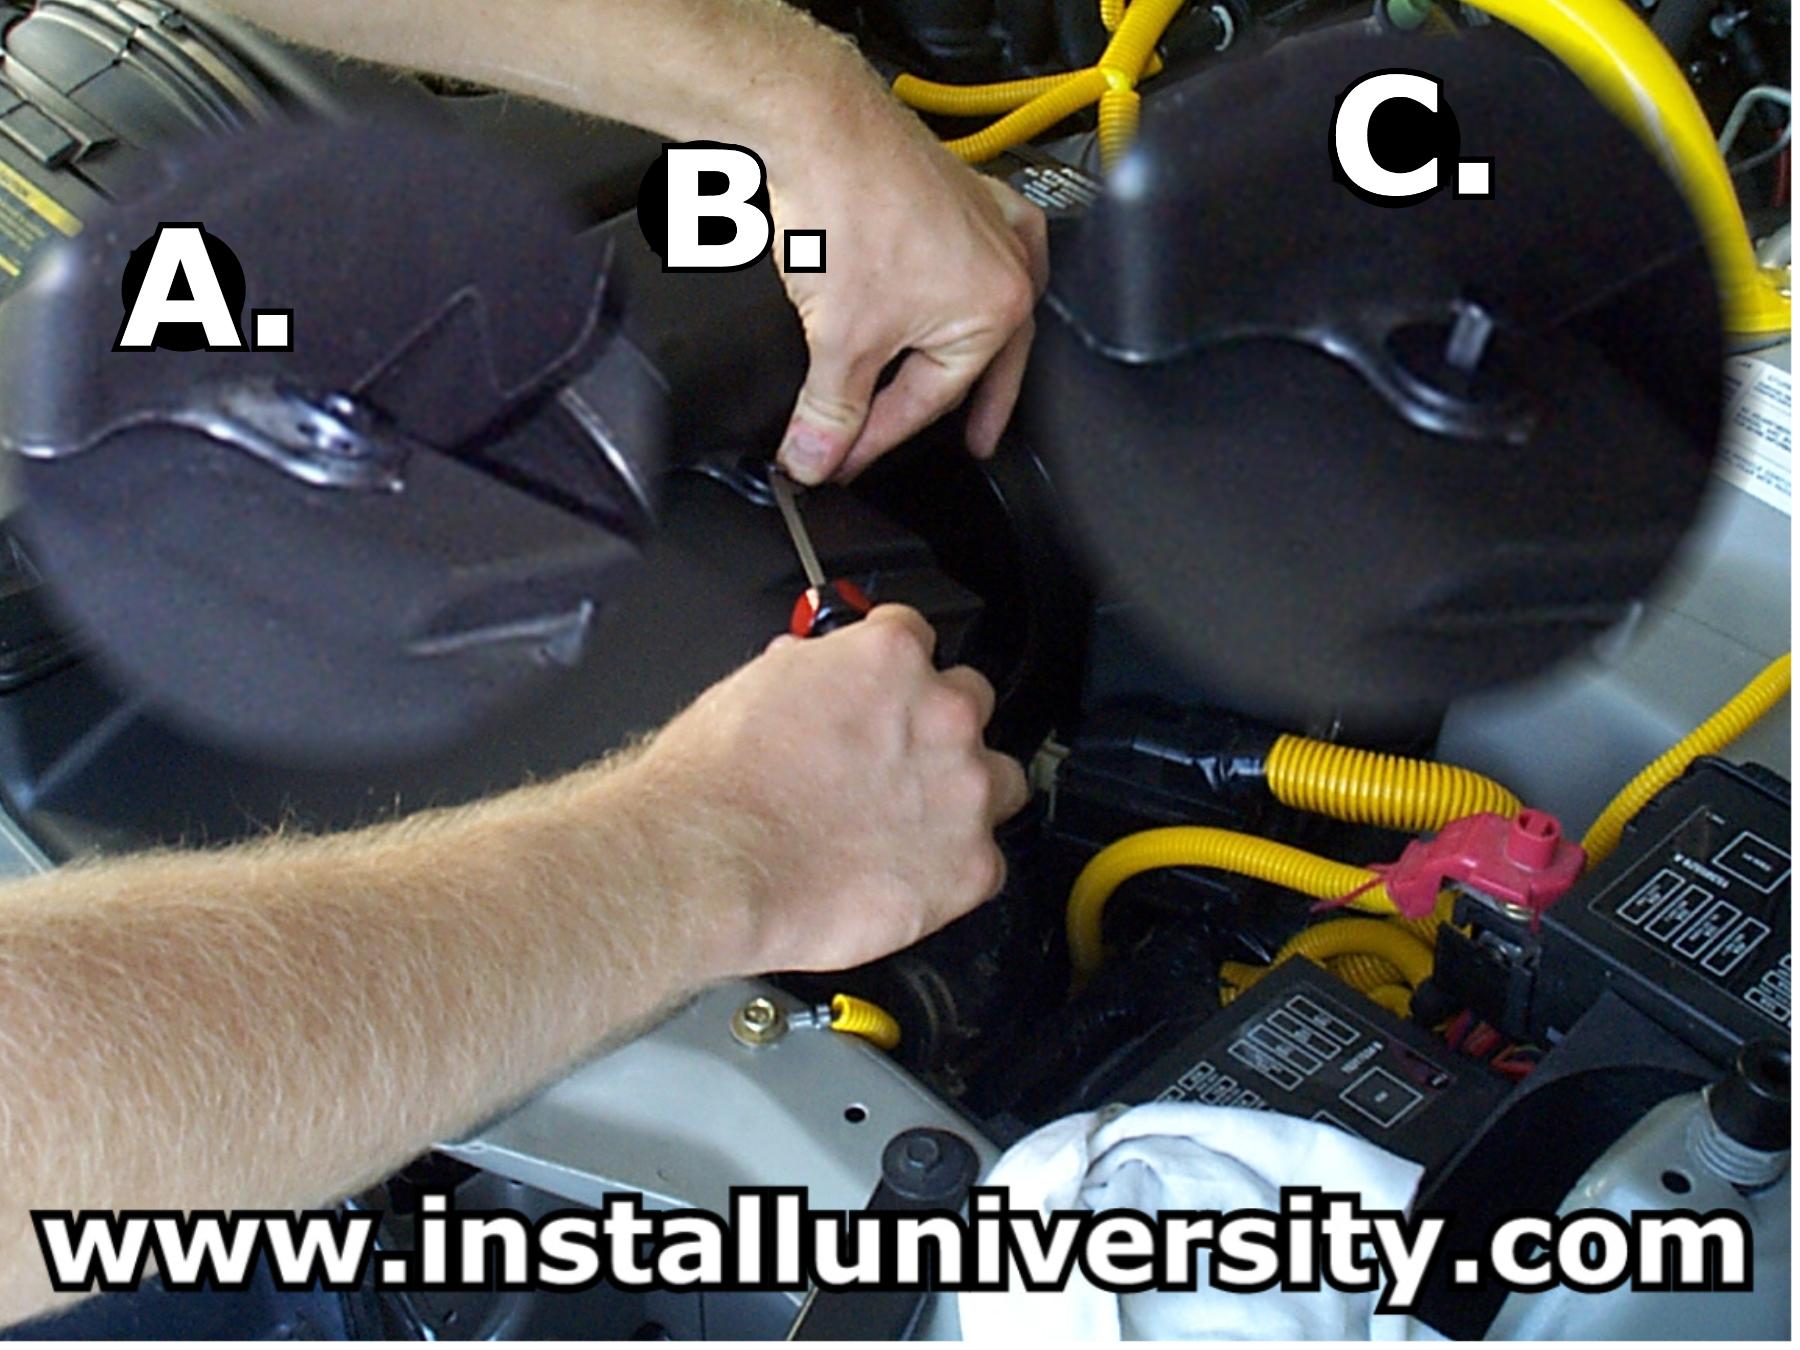
3. Now you will have to remove the two plastic clips that hold down the air silencers (see blue arrows in Figure 3). Refer to Figure 4 for the three-step process to remove a pushpin. A. Locate the pushpin on the driver's side of the air box assembly. B. Place a flat-head screwdriver underneath the head of the pin while holding down the "collar" portion with your thumb. C. Pull pin up and remove.
Make sure to keep the clips just in case you need to replace your factory air box lid for a trip to the dealer or other need. If you do break the clips they come in packs of ten (10) and are really cheap. The GM part number is 12551599.
Figure 3

Figure 4
4. Locate the wire harnesses from the intake air temperature sensor on the air box lid, the mass-air-flow sensor and the two throttle body sensors (see Figure 5).
Figure 5
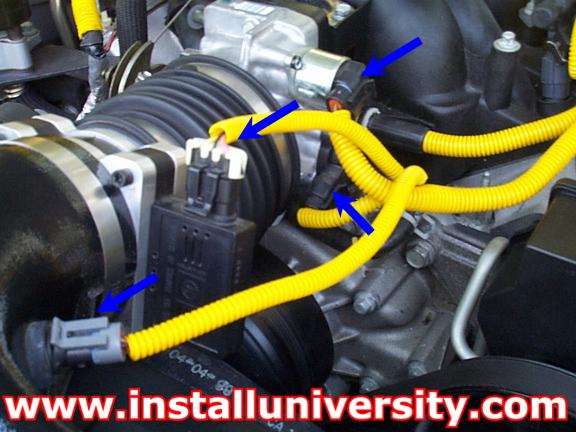
5. Now, you will need to remove the four wire harnesses from the air box assembly that are shown in Figure 5. You can see an example showing how to remove the sensor connectors safely in Figure 6. Gently pull the tab out and lift the sensor out of the housing.
Figure 6

6. Go ahead and locate the flexible rubber hose that runs from the mass air flow housing (MAFH) to the throttle body (TB) (see blue arrow in Figure 7). Take a flat-head screwdriver and loosen the metal clamp.
Figure 7
7. Grab hold of the air box, lift and pull towards you (see Figure 8).
Figure 8

8. If you have performed the Throttle Body Bypass modification then skip to Step 11. If you have not performed the modification or do not know what I am talking about then continue on to Step 9.
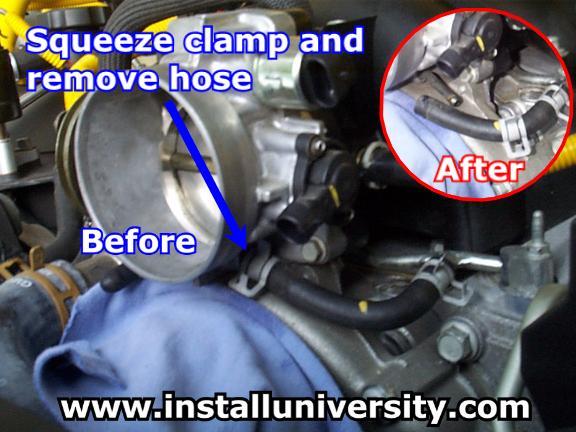
9. Locate the driver's side of the throttle body and find the rubber hose that exits the throttle body on the driver's side. Place a small rag underneath the area where you are going to remove the rubber hose. A small amount of coolant will spill out. Squeeze the hose clamp on the rubber hose and slide it back down the hose a little ways. Remove the hose from the metal line (see Figure 9). Removing the hose can be quite difficult. We used a flat-head screwdriver and gently pried the hose back. Once the hose moved a little the hose came off with ease.
Figure 9
10. Locate the passenger's side of the throttle body and find the rubber hose that enters the throttle body on the passenger's side. Place a small rag underneath the area where you are going to remove the rubber hose. A small amount of coolant will spill out. Squeeze the hose clamp on the rubber hose and slide it back down the hose a little ways. Notice we did not illustrate this in Figure 10. Remove the hose from the metal line (see Figure 10). Removing the hose can be quite difficult. We used a flat-head screwdriver and gently pried the hose back. Once the hose moved a little the hose came off with ease.
Figure 10

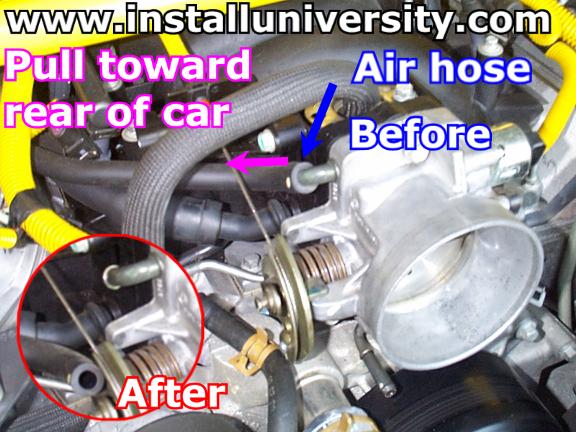
11. Locate the crankcase vitalization hose on the passenger side of the throttle body (see Figure 11). Remove the pipe by pulling it back toward the rear of the car. The hose should slide right off.
Figure 11
12. Does your car have traction and cruise control? If your car is not equipped with traction control and is equipped with cruise control proceed with Step 13; if your car is equipped with traction control or does not have cruise control proceed with Step 14.
13. You have an extra cable that operates cruise control. Pull the plastic tab off the outside of the cam on the passenger side off the linkage. It should come of very easily.
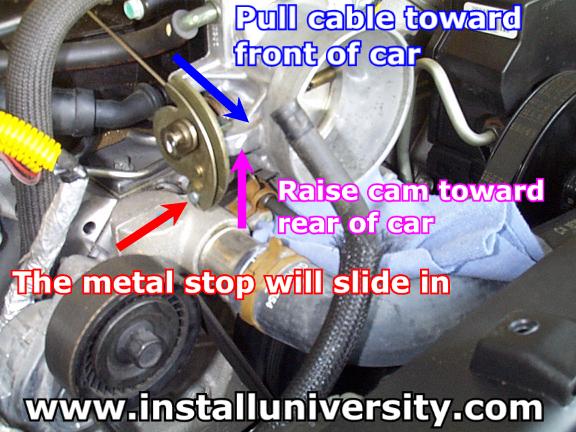
14. Raise the cam and pull the throttle cable toward the rear of the car. This will place enough slack so you can easily slide out the metal stop. This whole process takes about 10 seconds to complete (see Figure 12).
Figure 12
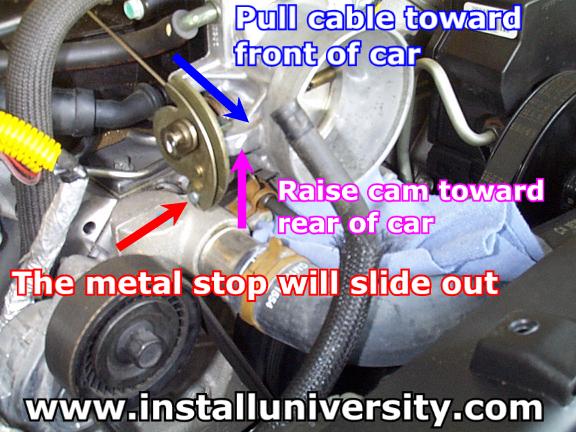
Note: For cars equipped with traction control, the throttle body linkage will have only one cable. If your car does not have traction control then you will have two cables.
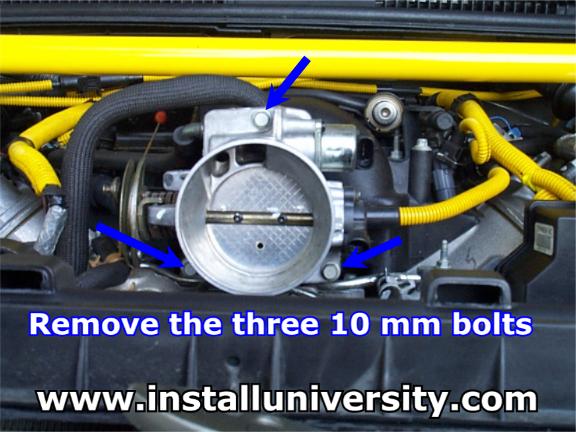
15. Remove the three 10 mm bolts that hold the throttle body to the composite intake manifold (see Figure 13).
Figure 13
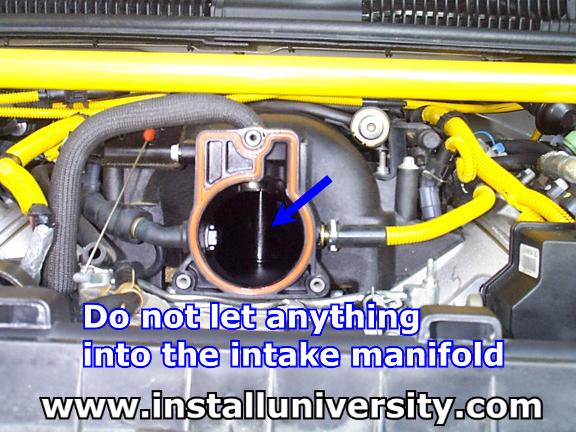
16. Read this entire step before proceeding any further.
Pull gently on the throttle body and it will come right off the intake manifold. You will notice you are left with a huge hole that leads directly into the intake manifold (see Figure 14). Place a rag over the opening after you have removed the throttle body to make sure you keep any contaminants out.
Note: Be sure you do not put ANYTHING inside the manifold. If something gets into the manifold other than air, you will have to retrieve it before you can start your car or MAJOR ENGINE DAMAGE will occur!!!!!!
Figure 14
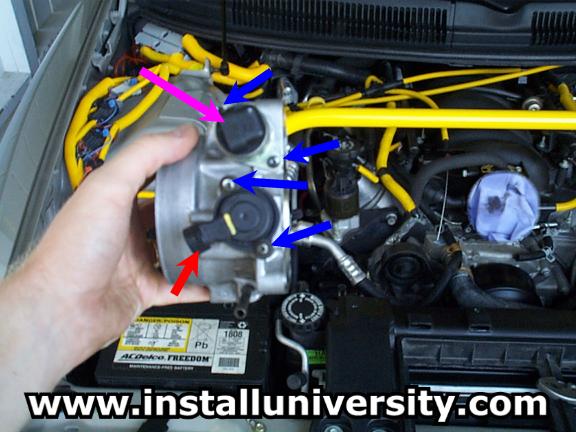
17. Look at the driver's side of the throttle body. Using a T-20 torx screwdriver, remove the two screws that hold the Idle Control Valve (IAC) sensor on the throttle body (see pink arrow in Figure 15). These screws were removed with moderate effort. When you pull the sensor out of the throttle body be careful with the o-ring gasket.
Look just below the sensor and remove the two T-20 torx screws that hold the Throttle Position (TP) sensor on the throttle body. These two screws were removed using a lot of effort (see red arrow in Figure 16). When you pull the sensor out of the throttle body be careful with the o-ring gasket.
Figure 15
18. This is the time you polish, port, or replace your current throttle body.
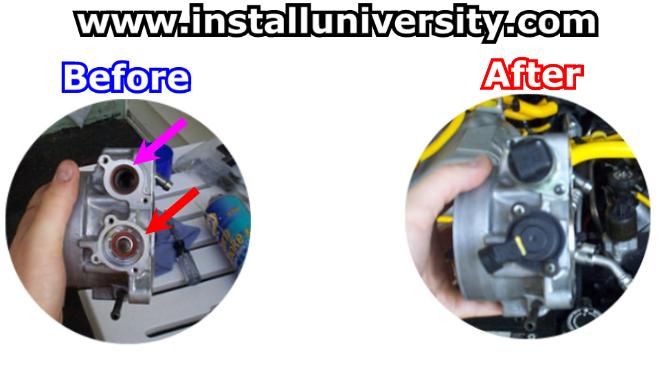
19. Replace the IAC valve (see pink arrow in Figure 16) and tighten the two torx screws to 27 in-lb. Replace the TP sensor (see red arrow in Figure 16) and tighten the two torx screws to 18 in-lb. We did not have a torx socket so we just tightened the screws to "tight".
Figure 16
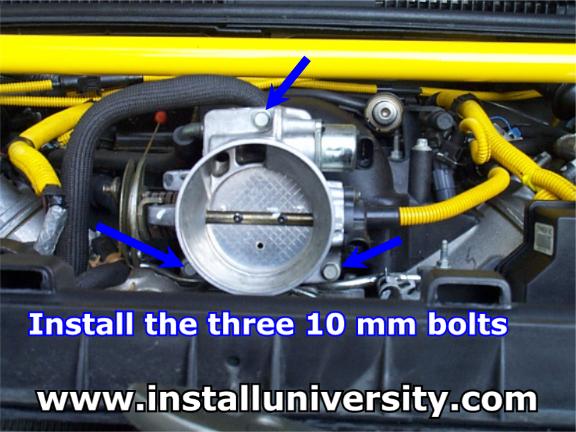
20. Take your new throttle body or existing one and place it back on the intake manifold and tighten the three 10 mm bolts to 106 in-lb (see Figure 17).
Figure 17
21. Replace your throttle cable (see Figure 18) and/or cruise control cable (if your vehicle does not have traction control but does have cruise control).
Figure 18
22. If your vehicle does not have traction control but does have cruise control replace your cruise control cable. Otherwise, proceed to Step 23.
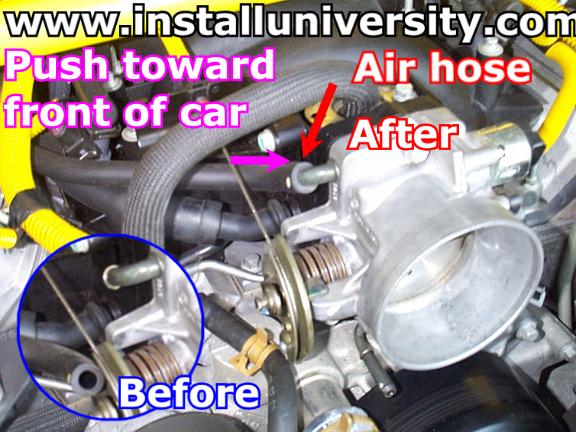
23. Locate and install the air pipe on the passenger side of the throttle body (see Figure 19). Install the pipe by pushing it toward the front of the car. The hose should slide right on with little effort.
Figure 19
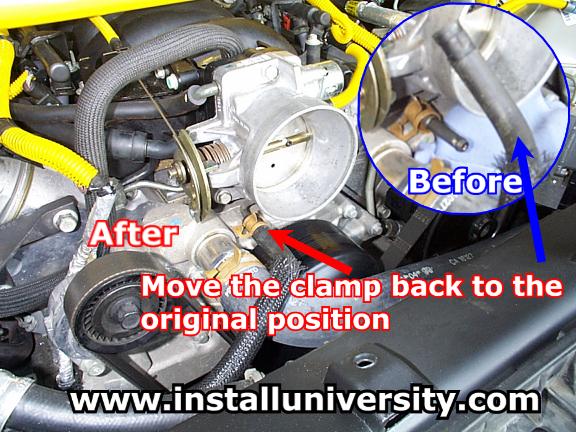
24. Locate the passenger's side of the throttle body and find the rubber hose that enters the throttle body on the driver's side. Slide the rubber hose back on the metal tube that enters the throttle body. Squeeze the hose clamp on the rubber hose and slide it back to the end, where it was originally (see Figure 20).
Figure 20
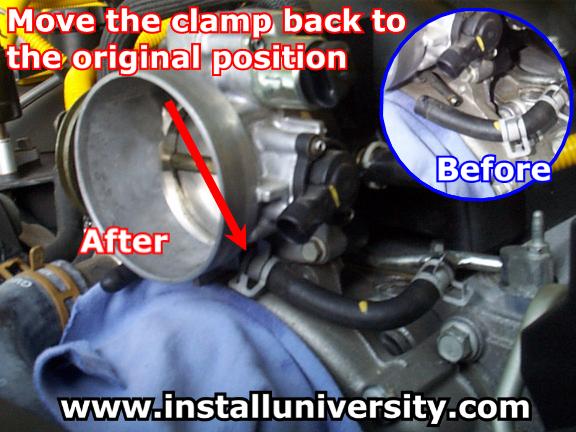
25. Locate the driver's side of the throttle body and find the rubber hose that exits the throttle body on the driver's side. Slide the rubber hose back on the metal tube that exits the throttle body. Squeeze the hose clamp on the rubber hose and slide it back to the end, where it was originally (see Figure 21).
Figure 21
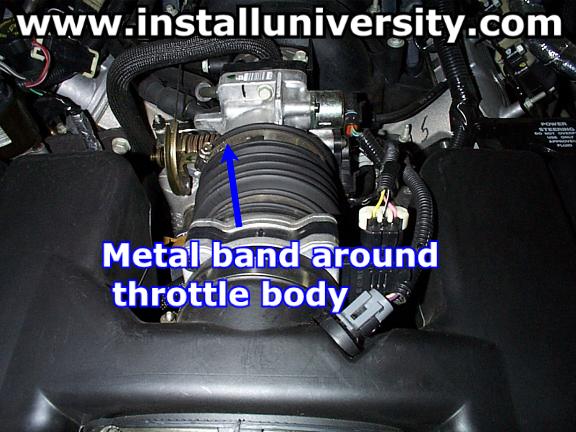
26. Grab hold of the air box lid (refer to Step 7) and push the rubber boot back on the throttle body. Make sure you get the rubber boot all the way back on the throttle body. Then tighten the metal band clamp on the rubber boot (see blue arrow in Figure 22).
Figure 22
27. Replace the air box pushpins (see Figure 23).
Figure 23
28. Close the metal air box clamps (see Figure 24).
Figure 24
29. Reconnect your 4 wire harnesses to their appropriate sensors (see Figure 25).
Figure 25
Comments: A throttle body swap is easy to perform. We just polished our throttle body because we wanted a better look to liven up the engine compartment.
Web Author: Eric Barger
help@installuniversity.com
Copyright © 1999 - 2002 Eric Barger. All rights reserved.
Revised: June 07, 2007
.